Thursday, May 9, 2024

Waybills, Part 115: Car Routing

This subject has come up partly in response to an email question I received awhile back (about a prior blog post) and partly from being in the audience recently for Jim Providenza’s excellent clinic on the topic. But when I thought about how I choose routings for the waybills on my layout, I realized I use a part of the process Jim didn’t address. This post explains it. 

Prototype waybills contain a section in which the route of the loaded car is specified, and it is to be in route order. Here’s that instruction on the waybill, all by itself, so you can see clearly what is wanted.

I have visited layouts at which this is rather roughly filled in, with railroads and no junctions, but most modelers know the national railroad network well enough to at least guess at junctions. And some routings can be easily guessed, for example, oranges from California to Chicago, very possibly Santa Fe all the way (except for perhaps some other railroad making delivery in Chicago). We can also choose routes in which the originating road moves the car as far as possible on its own rails, and this would be realistic if a railroad agent chose the routing.

But it’s important to realize that, after a series of hard-fought court cases, it was determined that the shipper had the absolute right to choose routing of his cargo, regardless of whether it benefited the originating railroad or not. The shipper might choose what was believed to be the fastest route (not necessarily the shortest); the route using railroads with the best service; or a route benefiting a railroad he wished to use, even if not the most direct. The only restriction was that it had to be an “approved route,” though there were so many of these that it would require ingenuity to choose a non-approved route, at least east of the Mississippi River.

There is a well-known story about a shipper of perishables in Southern California, whose packing house had a spur served by the Santa Fe. But he had had numerous disputes over charges and service with the local Santa Fe officials, and accordingly he routed his carloads about two miles on the Santa Fe, to the nearest Southern Pacific junction, and then onward via SP, followed by any railroad except the Santa Fe. This was entirely within the rules.

This story amplifies my point that the routing actually chosen by a shipper for a particular cargo might not be the apparently logical one. And prototype waybill examples bear this out, with many routings not at all obvious from the map. But not just any map. We need the right sort of map.

One place to find these is with a railroad atlas, that is, a set of railroad maps, not a highway map. At times, Kalmbach has reprinted some Rand McNally atlases of this kind, and these can usually be found for sale by on-line booksellers. The most detailed one is the 1928 atlas, with the drawback that many of the smaller railroads in it were later merged into other roads, or abandoned. I still like it for its detail. Its cover is shown below.

For some purposes, one might prefer a later atlas, for the reasons I mentioned, and indeed Kalmbach did reprint a 1948 version. Some of the detail was removed, but generally it is quite useful in its own right, relative to the 1928 atlas. Here’s its cover:

So what do I do in figuring out a routing? Let me choose an example process. Let’s say that I want to choose an inbound load to one of my 1953 layout industries. A great source of industry information is the OpSig industry database (see: https://www.opsig.org/Resources/IndustryDB ), but even more information of this kind is available in reprinted Shipper Guides for individual railroads (the ones currently available at Rails Unlimited can be seen here: https://railsunlimited.ribbonrail.com/Books/shippers.html ). 

I’ll choose a load inbound to my Caslon Printing Co. in East Shumala on my SP layout. There was a national market in printers’ equipment and supplies, so I looked for sources in the recently-printed B&O Shipper Guide (see my review at: https://modelingthesp.blogspot.com/2024/01/another-excellent-shippers-guide.html ). On page 468, under Printers and Printers’ Supplies, I found Ace Electrotype Co., offering engravers’ supplies. They were located on a B&O siding, so the B&O would be the originating railroad and would write the waybill on a B&O form.

How would a shipment like this move to the west coast? A majority of such shipments moved through Chicago and then via the Overland Route to SP rails in Ogden, Utah. Since B&O did serve Chicago, they might have wanted this load to move to Chicago on their rails. But the shipment is really going to Southern California, and the traffic manager at Ace Electrotype might choose instead to route the car to St. Louis (also via B&O), for transfer to the Cotton Belt, thence through Texas via T&NO to SP rails at El Paso. Either route is reasonable.

But that traffic manager may have a friend (or sales colleague, who sends him a bottle of Scotch every Christmas) at the Western Maryland, so he may choose WM westward. Then the B&O hands the load to the WM in Baltimore, and it moves through Connellsville, PA to the P&LE, which would hand off to New York Central in any one of several places. At that point, the car can move to either St. Louis or Chicago as described above. And in St. Louis, the car might be transferred to the Rock Island, which could take it to SP rails in Tucumcari, New Mexico, instead of Cotton Belt. And so forth.

The foregoing examples are major railroads and major cities. Where the railroad atlas really shines is for a small town, either as origin or destination. What railroad(s) served New Bern, North Carolina? or Holland, Michigan? Brownwood, Texas? Billings, Montana? Answers are easy with a railroad atlas.

I’ll continue with some details, and example of waybills I’ve generated this way, in a future post.

Tony Thompson

Monday, May 6, 2024

A Jordan spreader for the layout

I have been intrigued by Jordan spreaders since I was a boy, and saw a spreader being worked on by a mechanic. Not sure where this happened, maybe near the Southern Pacific’s Burbank, California depot, and I had no idea what this complex machine was. But others who knew railroading explained it to me, and I find them interesting to this day.

Today we have a phenomenal amount of information about SP spreaders, because of Ken Harrison’s magnificent opus on a wider topic, Southern Pacific Maintenance of Way Equipment, published by the SP Historical & Technical Society in 2022. (You can read my review of the book at: https://modelingthesp.blogspot.com/2023/02/ken-harrisons-marvelous-addition-to-sp.html .) Ken devotes the entirety of his Chapter 2 to spreaders, and my knowledge of SP’s machines largely stems from this chapter.

Photos of spreaders at work aren’t common (aside from snow removal, which doesn’t occur on my layout), so I was delighted to find the photo below in Ken’s book. It was taken at Seacliff, California (on the Santa Cruz Branch) on March 19, 1978 by Gary G. Allen, from the John Shaw collection. One side of the spreader is re-contouring the trackside area.

Manufactured for many years by the O.F. Jordan Company (thus their name) in East Chicago, Indiana, spreaders came in quite a few variations and several sizes. SP owned many of the variations. I have long thought that my layout needed to host a Jordan spreader somewhere, and in fact the layout does include what SP called an “outfit track,” used to host or merely to store work outfits, comprising all kinds of work cars.

But this idea of including a spreader has remained dormant for years. I have occasionally been tempted by brass models of Jordan spreaders, though the cost is substantial, and the Walthers plastic HO model seemed too modern. But aha! Looking into Ken’s book, I understand better what I am looking at. The most important point to recognize is that Jordan’s product didn’t change that much over the years, the most visible aspect being where the cab was located, and how big it was. Let’s have another look at the Walthers model, in its recent assembled incarnation (there was a kit in the 1990s).

A side view shows the vivid orange color (SP was just beginning to use this color for spreaders, in place of the traditional boxcar red, in the 1950s) and the probably arbitrary number, SP MW 4000. In a 1956 SP MW roster, car 4000 was a boarding bunk car. There were a number of spreaders with higher 4000-series numbers, so this is at least in the ballpark. I’ll change it.

What is immediately striking about the model is the very high plow in front. I cannot find that SP ever bought a Jordan spreader like this, certainly not in the 1950s, which I model. Instead, the SP ones with a sort of centered cab location like the model, had a far smaller size of front plow or faceplate. 

I’ll illustrate with a photo from the book, a Jordan builder photo of SP MW 4066 from 1953 (John Shaw collection). This spreader is a lot like the Walthers model, except for the front shape, at left. Note also that the paint is boxcar red. Trucks have solid bearings, not roller bearings like the Walthers model.

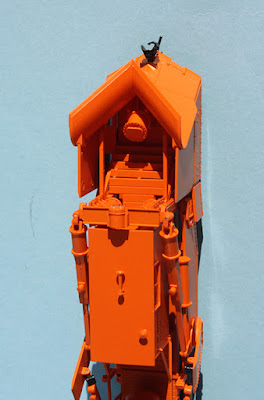
Could I just cut down the Walthers front plow? Luckily, the detail inside the plow is included, including the front steps descending from the cab, and the pneumatic cylinder that is prominent in the photo above. Here’s how it looks:

I soon realized that the low front configuration of SP spreader 4066, shown in the prototype photo above, is in fact molded on the Walthers model along the bottom of the front end, but with a great deal of higher material added at sides and front. My first step in seeing if it could be modified, was to remove the front structure entirely. By removing the front coupler, this can be wiggled free. Here’s the front view at this point.

I would need to re-install the lower part of the front structure, and I could also remove the overly heavy “railings” which were used to support the tall front plow. In addition, the pneumatic cylinder should be vertical. But the important point is that I think this project can be done, and I’ll return to how I did it, plus painting and lettering, in a future post. 

Tony Thompson

Friday, May 3, 2024

An SP Class F-125-1 flat car, Part 2

In the first part of this series, a ClassOne Model Works depressed-center flat car was chosen to be modified into an SP Class F-125-1. I showed the addition of steel end decks to one of the “ready to run” models, after removal of the original wood end decks, and drilling of some tie-down holes in the new deck (see that post here: https://modelingthesp.blogspot.com/2024/01/modeling-sp-class-f-125-1-flat-car.html ).

A less visible but important aspect of the ClassOne model is that it has roller-bearing trucks. The SP cars, however, were built with and long retained solid-bearing trucks (there is a photo of the SP Commonwealth truck for this class here: https://modelingthesp.blogspot.com/2023/10/the-new-class-one-flat-car.html ). 

There are various ways to alter roller-bearing trucks to the older type, but the simplest is to just file off the details that make them roller-bearing trucks. You can see that I’ve done this below, in the gray plastic areas.

Next, replacement journal boxes and covers needed to be added in each place that the roller-bearing end caps were located. I sliced these boxes off old plastic truck sideframes that for various reasons had been taken out of service, easy to do with a fresh razor blade. They were then glued onto the round gray areas you see above, using canopy glue. 

This isn’t really quite right, but does provide a non-roller-bearing look. For correct journal-box appearance, these should be a little larger. The prototype Class F journals were 6.5 x 12 inches, substantially bigger than the conventional 50-ton truck with Class D 5.5 x 10-inch journals.

With the work on trucks completed, it was time to paint the car body. I used Tamiya “Fine Surface Primer, Oxide Red” for this. There are those who inveigh against use of “rattle cans” for model painting, but they must not be familiar with the superior spray nozzle of Tamiya products. You do in fact have quite good paint control, and there are none of the “blorts” of paint often produced by cheap rattle cans.

Lettering is a challenge, obviously requiring piecing decal numbers. Here is a builder photo (SP) of one of the two SP cars in Class F-125-1, SP 39900 and 39901, taken outside the Algiers, Louisiana erecting shop where the cars were assembled. (You can click on the image to enlarge it.) Unfortunately, the car has not yet been weighed, thus the light weight and weight limit are not yet stenciled. New date is 3-53.

We can calculate the missing numbers. These were 125-ton cars, thus were equipped with trucks having Class F journals, as noted above. Such journals had a maximum-weight-on-rail capacity of 62,750 pounds per axle. That means that the car’s maximum weight on rail, the sum of the light weight and the load limit, would be 376,500 pounds. There exists a 1959 photo (p. 368 in Volume 3 of my series, Southern Pacific Freight Cars) of one of these cars, after the 1956 renumbering to SP 500501, which shows the load limit as 248,500 pounds. Subtracting the load limit from the maximum weight on rail means that the light weight was 127,500 pounds, which is consistent with what can just be read on a fairly dirty car side.

This is of course the classic example where no commercial decals (that I know of) exist to make lettering easier. For the 7-inch road numbers, I used the nice Microscale set #87-911, which is for wood box cars, but of  course numbers are numbers. The capacity data are more of a challenge, especially duplicating the numbers calculated above. I decided not to duplicate them exactly, but called on a used set I have, originally made for a Pennsylvania heavy-duty flat car. I was able to use other decal sets on hand to find lots of the other small lettering (or good approximations).

Once all decals were applied, I gave the car a coat of Tamiya “Flat Clear,” TS-80 (far better and more consistent than Dullcote, and with a far better spray nozzle than Rust-Oleum Testors seems willing to provide). You can see below that I either matched or simulated the small lettering too.

With the car lettered, and with a built date during my modeling year of 1953, I wanted to add just a light coat of weathering to tone down that “brand new” look. I went to my usual weathering process of applying washes of acrylic tube paints (see my “Reference pages” link at the top right of this post), including a fair amount of “grunge” on the trucks. I then added route cards and a couple of chalk marks.

Even though SP only owned two cars like this, I am happy to have an example, relatively easily converted from the new ClassOne Model Works car. I’m already working on some suitable loads for it.

Tony Thompson

Tuesday, April 30, 2024

A really old Silver Streak kit

At the Pacific Coast Region (NMRA) convention last weekend, I picked up a really old Silver Streak car kit. I suspect it predates 1953, since lists of Silver Streak freight car models for that and all subsequent years don’t contain it. (My source for this kind of info is, as usual, the HOSeeker website, at: https://hoseeker.net/truscalesilverstreak.html .)

Supporting that idea of kit age is the car kit box, black with silver decoration. Note below, that on the top of the box is shown what was probably Silver Streak’s best-known and certainly best-selling model, the Hart convertible gondola. At this time, the company name was “Pacific HO,” thus the PHO reporting marks on the gondola on the box.

This is the earliest box used by Silver Streak. The same company made Tru-Scale roadbed, which became a big enough seller that the company changed its name from Pacific HO to Tru-Scale, and also changed the box for car kits to a greenish color. 

Eventually the original company went out of business, and for a time Walthers sold the car kits, using a similar box but in yellow, and with the Walthers name replacing that of Tru-Scale.

The car that I acquired had been partly assembled, with the basic wooden body box very nicely built, the underframe mostly completed except for couplers, and the printed sides attached. As mentioned, I have not found any Silver Streak product list that shows this URTX scheme, confirming the early date. It’s also interesting that the model is 40 scale feet long. Many early Silver Streak models were about 10 percent oversize, but not this one.

There were essentially all the needed parts still in the kit box. The photo below shows them (you can click on the image to enlarge it if you wish). The end and roof “wood” sheathing is at bottom, and the rather wide running board at left.Next to the running board at the top are the dummy couplers (their boxes are near the end parts), and next to the couplers are the ice hatches. Note that these have the long boards to support hatch rests, but no ice hatch platforms, as was usual on wood roofs. I have not found other Silver Streak reefer kits with wood roofs and such ice hatches.

Also shown above are the cast ladders at top right, relatively low profile even compared to cast-on ladders; these will be replaced. At top center are two shapes of staples, intended as sill steps and grab irons, which will also be replaced. Below the ice hatches are the door hardware parts, coupler boxes, and handbrake parts, the latter being replaceable.

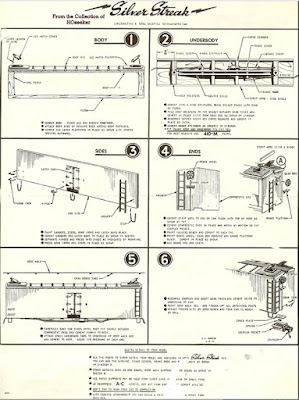
My kit box didn’t contain any instructions. Instructions for later Silver Streak refrigerator car models are available on the HOSeeker website, as I show below, but obviously a different car is shown in this document, representing a metal instead of wood roof, and with ice hatch platforms. I will use these directions to the extent that they apply.

I want to proceed to complete this model, using the major kit parts, but upgrading a number of the minor parts such as grab irons and ladders, and of course couplers. I also want to examine what I can find about the prototype for this car (in the 1950s, it was not yet the practice to decorate models for prototypes that never had that body type). I will describe those processes in a future post.

Tony Thompson

Saturday, April 27, 2024

What makes a good layout description?

At the recent ProRail event, I chatted with several experienced model railroad layout operators, and this subject came up: what makes a good layout description? (Meaning, of course, a description of one you haven’t been to before; or in the other direction, what you should try to describe for first-time visitors to your layout.) For some background comments on ProRail, see this post: https://modelingthesp.blogspot.com/2024/04/prorail-2024.html .

We all agreed that the quality and helpfulness of layout descriptions vary widely. Sometimes you are overwhelmed with details of what is on the layout, or are given multiple pages of information about how operations work on that layout. Often it’s difficult to sort through all the detail when you’ve never seen the layout.

Sometimes you receive something like this: “I won’t describe the layout itself, because it was well covered in Great Model Railroads in 2004.” Not too many of us keep publications that far back; and even if we do, we may be reading the layout description on the airplane while traveling to the operating weekend where we will operate on that layout. Needless to say, the reference to GMR is not helpful in that situation.

Now I’m not criticizing anyone whose layout has been in GMR or any other publication; in fact, mentioning that kind of coverage demonstrates that the layout is at least visually quite good. So by all means, such a reference ought to be in a layout description, but not as a substitute for actually describing the layout. 

Photographs can be helpful, though rarely a major part of the layout descriptions one receives. In particular, a panoramic photo of a layout may show a great deal of what the layout is like, though such views aren’t commonly seen. Below is a fine example, the late Jack Parker’s Northern Pacific layout, published as a double-page spread in GMR for 1995.

Even photos of individual scenes on a layout may make you think, “Wow, I’d love to operate there.” By and large, photos of that type are as uncommon as panoramas. To illustrate, I’ll show a photo I took at John Breau’s outstanding layout in Kansas City, showing the local freight I operated, having just completed switching in the town of Dutton, Montana.

A much more familiar example is the superb Tehachapi layout of the La Mesa Club in San Diego. This scene at Caliente captures much of the appeal (and size) of this layout.

Some of this problem is that the magazines we all read are very focused on visual quality, especially close-ups of detailed scenes. It isn’t easy to portray operational qualities in a magazine, and often an article doesn’t even try. That’s why a number of excellently-operating layouts would never be shown in a magazine. But beyond photos, what else conveys the information you want?

We soon agreed, in our conversation, that the basics for a visiting operator include era modeled, prototype railroad if any, and location in the world (if you model Santa Fe, is it in Chicago? Topeka? Raton Pass? San Bernardino? those would be quite different layouts). Of course, scale makes a difference, and so does operating scheme (CTC? Timetable and Train Order? Track Warrants? just run and have fun?) and, to some extent, DCC system (Digi-trax, NCE, Easy DCC, etc.).

How about track plans? Some of us really liked to study a track plan in advance, others felt that a schematic of the track plan was in some ways better, because it shows you how the layout will work. That isn’t always obvious in a track plan. It can also be informative to mention what the layout emphasizes: small farm communities on a branch line, high-speed mainline passenger trains, large classification yards, dense urban switching, and so on.

Layout size matters too. A frequent way of conveying that is to state the square footage of the layout. That of course does convey size, but shape is important too. Is it long and narrow? square? L-shaped? or something else? Knowing shape and dimensions (which a track plan would include), and an operating schematic, does give you a pretty good idea of what the physical layout is like.

Most of us felt that descriptions of the operating scheme can be fairly brief for an experienced visitor. Pages and pages of procedures and copies of multiple forms that are used aren’t essential. I have occasionally gone back after a session on a layout which provided all that paperwork in advance, and found I could understand it far better in retrospect than beforehand.

A couple of people mentioned a common problem, one I’ve been guilty of myself, providing a layout description that is the layout owner’s idea of what the layout is, rather than trying to see it from the perspective of a first-time visitor, and what might be helpful to explain (and what you needn’t explain because it’s fairly obvious). I try to avoid this problem, but probably haven’t quite succeeded.

I have, in a way, written two layout descriptions. One is a description of layout history and background, for visitors at, for example, open houses. A version of it is available on Google Drive (you can find the text at: https://drive.google.com/file/d/1YUu3bOCnFQgch43CKynJHVgYOLckQZ4H/view?usp=sharing ). I can see some minor modifications that should be made.

My other layout description is really an introduction to how the layout is operated, not a guide for a visitor, and is distributed before operating sessions. Here’s a link to the current version, also on Google Drive: https://drive.google.com/file/d/1pz7aKNNZatON-DP22fU42uV0HGXjllSa/view?usp=sharing . How did I do?

Tony Thompson

Wednesday, April 24, 2024

ProRail 2024

The Prototype Railroad Operating group (ProRail) meeting this year was in the San Francisco Bay Area. It was last here in 2015. I was among the layout hosts this time, and have more to say about that below. As background, this annual event began 52 years ago in Chicago, followed the next year with one in Kansas City, and those two locations hosted their respective 50th anniversaries in 2022 and 2023. For background, please visit: http://www.prorail.org/ .

One of the ProRail traditions I enjoy is attending a baseball game on the Thursday before the event begins. This is often a major-league game, but minor-league ballparks are fun too. This time, naturally, we went to see the San Francisco Giants, playing the Arizona Diamondbacks. We had nice seats in the boxes on the first-base side. Here’s a view in the top of the fourth inning.

I was scheduled to host two operating sessions which, as it happened, were my 90th and 91st on the present version of the layout. I was flattered to see the people who had chosen my layout as one of their operating options, as several of them are people I have looked up to for years. Naturally I put in a lot of hours making the layout the best it could be, despite some hiccups I was aware of (more about that in a moment).

The Friday operating crew was Doug Harding, Paul De Luca, Bob Willer and Rene´ LaVoise, all Midwesterners. After the usual briefing, perhaps enlarged a bit as none of them had operated here before, we settled into the session. As you can see below, Bob (at left) and Paul first worked at Shumala, before we broke for lunch, with Bob as engineer here. I’ve visited both their layouts and enjoyed the operating sessions on both.

On the other side of the layout, Rene´ (at left) and Doug were working Ballard, though in the view below, Doug was snapping a few photos. I was at Doug’s layout for the first time last year, though I’ve known him for what seems like a lot of years.

Everything went fairly smoothly (we did lose a couple of coupler springs), except in the trouble area of trackwork about which I’ve been posting (see the most recent at: https://modelingthesp.blogspot.com/2024/04/trackwork-wars-part-13.html ). 

Before the first session, I had gone over this track with a fine-toothed comb, and found that the curved switch was now distinctly tight in gauge when thrown one of the two ways. I know it wasn’t that way before installation, because I checked it carefully first (a habit I developed in the days when brand-new Shinohara switches were not infrequently out of gauge). 

During the sessions, the engine was run really slowly over it, and it mostly ran okay, but I hated it not being right. I will just have to get back in there again and try to figure out how to correct it.

The second session again had a distinguished operating crew, Jerry Dziedzic and Bob Hanmer, joined by Mikc Chandler and John Walter from  Vancouver, BC. Again, people I’ve know and operated with for years. The crew starting out on the Shumala side of the layout comprised John (at left) and Mike. John was the conductor here, and is holding some waybills.

Meanwhile, at Ballard, Bob (at left) and Jerry were at work. I’m not sure what Jerry was doing in this photo, but I remember that both he and Bob were amused about something. Maybe a switching mistake? Here again, the photos were taken before the lunch break. The weather was nice enough that we ate outside on our patio.

In addition to all of the above, our local committee hosted a dinner for visitors and layout hosts together, another chance to meet or reunite with this community, and a few friends even came by my layout in the evening to see it, if they hadn’t gotten it as an assignment. I mention this as emphasis for the significance of the social side of the operating hobby.

Altogether, this ProRail was really fun, to have long-time acquaintances and friends operate my layout, and of course a chance to renew friendships and make new ones. To me, that’s a big payoff from operating sessions. I know some people find them stressful and a little too challenging, but I find them fun, both the model railroading and the people connections.

Tony Thompson

Sunday, April 21, 2024

Waybills, Part 114: managing the “fleet”

It’s been awhile since I commented on a waybills topic, and preparing for operating sessions this month (four in all) has reminded me of some aspects I haven’t discussed at all recently. (To find previous posts in this series, the easiest way is to use “waybills, part” as the search term in the search box at right; they will mostly come up in chronological order.) For most purposes, the best overview or guide to the first 100 posts on the topic is here: https://modelingthesp.blogspot.com/2022/11/waybills-part-100-guide.html .

Part of what I want to discuss in the present post is management of the entirety of the waybill collection used on my layout, as it now is. Some of what I will touch on has been presented in basic form in an earlier post (see it at: https://modelingthesp.blogspot.com/2017/03/waybills-part-58-more-on-managing-bills.html ), and I want to add to that background.

My basic system is to file waybills by industry, and the waybills for that industry are filed by reporting mark. Within each reporting mark, they are filed by car number. This makes it quite easy to select waybills to use for a particular industry in an upcoming operating session, or to find a particular car’s waybill for that industry. 

My waybills are enclosed in baseball-card collectors’ clear plastic sleeves, and I use a card-collectors’ storage box for the waybills between sessions. It’s shown below. The magenta dividers indicate towns on the layout.

In the case that I want to use a particular freight car in an upcoming session, and need to know what industries’ waybills may have been made for it, I turn to my “pairs list,” a multi-page document listing all shipper-consignee pairs that exist (for background, see: https://modelingthesp.blogspot.com/2012/02/waybills-17-pairs-list.html ). Every new waybill is added to this list. And since it is an digital list, it is readily searchable for any car number.

In a decade of operating the layout in its present form, and some 90 sessions in total, the system has really worked well. It is simple and convenient to manage waybills and thus car movements, and I have been happy with the relative realism of the paperwork.

But the perhaps more interesting aspect I want to discuss stems from a question I was asked, after presenting a clinic about my waybill system. The question was, “How many waybills do you make for each operating session?”

I responded by saying, in effect, “This is really two questions. The first is, and I think what you meant is,  ‘how many waybills do I have to make for each session,’ but I think there is implied a second question, ‘how many waybills do I actually make for a session?’ ” Then I went on to say the following.

The number I have to make is really zero. I have a substantial number of waybills, more than one for many of my cars, but at least one waybill for every car in the fleet. In addition, I have a number of “overlay” or half-bills, which allow multiple cars to have a particular load. (For a description of that idea, see this post: https://modelingthesp.blogspot.com/2015/06/waybills-part-41-overlay-bills.html ; and if you are interested in that topic, using “overlay bills’ as a search term in the search box at upper right of this post will show you some additional commentary, such as this one: https://modelingthesp.blogspot.com/2022/09/waybills-part-99-more-on-overlay-bills.html .) So it is only if a new car has been added to the fleet, that I have to make a new waybill.

But in fact, I often do make new waybills before an operating session. Why would that be, given that I don’t really have to do so? One reason is that I discover faults in waybills that may have been made years ago. Sometimes it’s merely a typo, which I want to fix. Here’s an embarrassing one: I got the car number wrong. (The one on the left is correct.) 

Sometimes I now have additional information about a purported shipper or destination, or about car routing (usually from a railroad’s Shipper Guide; see: https://modelingthesp.blogspot.com/2024/01/another-excellent-shippers-guide.html ). Sometimes I failed to include the actual destination, such as the team track or house track. Here again, the left-hand bill is correct; I noted the error by hand, on the right-hand one.

As I have developed more and more ways to represent rubber stamps on waybills, I have replaced the old one with a new, stamped one. In the case shown below, it’s a weight agreement stamp, added to one on the left.

And sometimes I am correcting state designations. In the early days of making waybills, I just used the conventional two-letter abbreviations, which in fact were introduced by the U.S. Postal Service in late 1963. But I model 1953, when the “traditional” state abbreviations were in use (a listing of both sets of abbreviations is available at: https://about.usps.com/who/profile/history/pdf/state-abbreviations.pdf ). I have often replaced an existing waybill with post-1963 state abbreviations on it, with the older style abbreviation (see any of the waybills above for examples).

So in an ongoing process, I do correct or improve older waybills, and as these come to light for particular sessions, I make new, correct waybills. I suppose I could go through the entire box (see photo at top of this post) and find all the replaceable ones, but that has never risen to a level of importance that I actually did that. I usually just fix ones I want to use. It’s all part of how I manage the (waybill) fleet.

Tony Thompson